The Best Picnic Veggie Salad

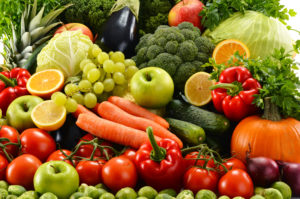
It’s sumertime at last!  And while it’s not the “holiday season”, summer does have its holidays.  These holidays involve picnics and fresh fruits and vegetables!  Gotta love a good picnic with everyone bringing something to offer and those tables weighed down with watermelon and salads and chips and all sorts of yummy stuff!

Of course, the weather is also warmer and you have to be careful that what you bring won’t go bad in the space of a couple hours if it’s not refrigerated.  And you really want something easy to make.  And it should be tasty, without detracting from all the other flavors at the table.  This salad fits the bill on all counts!

Won’t go bad

You need something that will stand up to the heat of the day and taste just as good fresh from the fridge as later when it’s reached room temperature.  Veggies do that for you.  You’ll see that the only bottled ingredient is mayonnaise.  Contrary to common belief, store bought mayo doesn’t ever really go bad.  It’s so processed that there is actually no nutritional value that will allow bacteria to grow.  (When store mayo gets old it will separate, but it will never grow mold.)  Since your veggies are safe at room temperature, and the mayo is safe at room temperature, this leaves just the bacon to be concerned for.  And you needn’t really be concerned for the bacon, either, since the preservatives in bacon will, well, preserve it.

Okay, so if you’re using a preservative-free bacon, cook it extra well and pull the salad out of the cooler just before the feasting begins.  And if you’re using your own home-made mayo?  Yeah – all bets are off.  Bacteria loves the protein in the eggs and will start growing as soon as the salad reaches room temp.  For the picnic, use the store bought stuff!

Picnic Veggie Salad

Totally easy to make

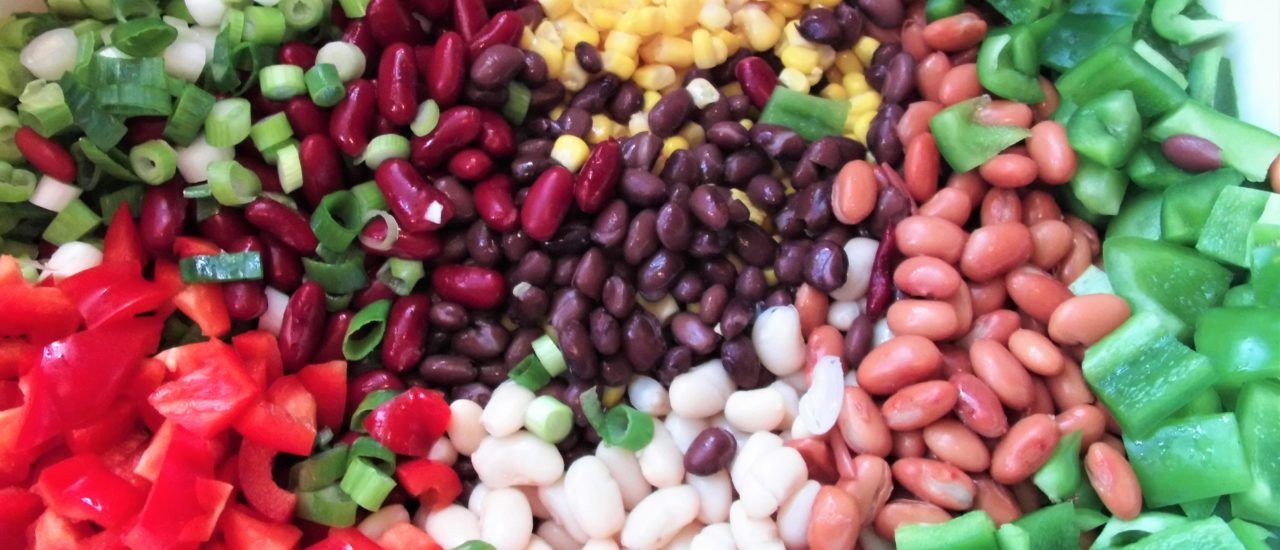
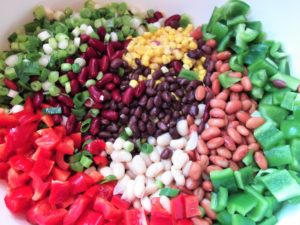
This recipe may look imposing with its long list of ingredients, but in reality, all you have to do is walk through the store and grab whatever you want to throw in.  No measuring is involved here – use the whole can of beans, chop the whole vegetable, etc.  (Don’t be silly – throw away the cores of those bell peppers.)  I usually just pile everything in one side of my sink and keep rinsing, chopping and adding till the pile is gone.

Maybe you want to add a can or two of sliced water chestnuts, or add some nuts of some sort.  Go for it!  With all those cans and veggies, this usually makes a lot more than the picnic will use and gives me plenty of leftovers.  And, yeah, cooking up a whole pound of bacon sounds like a lot, but once you start filling that bowl (use that really big tupperware bowl you were given that time – the one that doesn’t fit in the fridge very well), you’ll see that a pound is a good quantity.  And, seriously, there’s no such thing as too much bacon!

Once in the bowl, you want to mix these carefully so that you don’t damage the beans.  I usually just reach in with my hands and fold the ingredients gently.  After I add the mayo, I’ll go back to using a wide spatula and fold till everything is well incorporated.

Picnic Veggie Salad (7)

Very tasty

I developed this recipe in culinary school as part of a larger project.  The mayo/dressing actually involved cooking up the bacon with onions and leeks as well as the garlic and pepper, then letting the mayo/bacon mixture rest overnight to let the flavors meld.  You can go all out, but these days I’m about making it easy.

You may be thinking that you don’t care for bacon (what a sad, sad life) and you will leave it out.  The bacon adds that perfect bit of saltiness and, in my opinion, really completes the flavor profile of this salad without being overwhelming.  If you decide to try this without the bacon, I would suggest you sweat the garlic and onion (use fresh onion instead of dried) – maybe even caramelize them – and add them to the mayo.  Let the flavored mayo sit overnight and add it just before you leave for the picnic.  You might even find yourself using flavored mayo like this on your sandwiches or anywhere else you use mayo.

Picnic Veggie Salad (4)

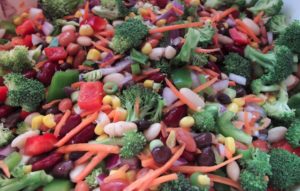
I love this salad!  All those beans and fresh veggies – I’m going back for seconds at the picnic!

Hope this helps make your picnics just a little easier and tastier, too!

The Perfect Picnic Salad
Print Recipe
This salad is easy to make, can be made in advance, and it involves bacon. Does it get any better than this? Oh yeah - it's naturally gluten free and dairy free. It just got better!
Servings Prep Time
2-3 dozen 30 minutes
Cook Time Passive Time
15 minutes 1-2 hours
Servings Prep Time
2-3 dozen 30 minutes
Cook Time Passive Time
15 minutes 1-2 hours
Ingredients
Servings: dozen
Instructions
  1. Mix the beans and vegetables in a large bowl.
  2. Cook the bacon with the garlic, dried onion and pepper till well done. Remove as much of the grease as possible.
  3. Add bacon and mayo to the veggies and mix well.
  4. Let sit for a couple hours or overnight.
Recipe Notes

For cooking the bacon, I suggest you chop it up raw and then cook it with the other flavors.  This makes it easier to work with.

Share this Recipe

The Art of the Chewy Chocolate Chip Cookie

When I told a friend I was writing a post about making chocolate chip cookies, she commented, “Why bother?  My mom always just used the recipe on the side of the bag.”  And, certainly, if you do a search on “chocolate chip cookie recipes” you’ll find more recipes that you could make in a lifetime, all claiming to be the very best!

nestle choc chipsIf you click on this picture, you’ll be taken to the “Original Tollhouse Chocolate Chip Cookie” recipe by Nestle.  Okay, everyone raise your hand if your mom’s recipe box included the recipe cut off the back of the bag, but your mom used the cheaper, generic chocolate chips.  These days we can just google for a recipe – but it never seems quite the same.  That’s okay – my purpose in writing this today is to give you a few insights on making your cookies a little chewier and tastier, just like Mom’s.

chocolate chip cookies

Let’s assemble all our ingredients!  Or, if you have a really small kitchen like mine, just clear the counter around your mixer so you have room to work.

A cook is only as good as her ingredients.

Make sure all your ingredients are fresh.  I tend to bake in phases – I might go months without baking anything.  But when the holidays roll around, you know you’ll find me shifting through my cookbooks to find the perfect cookies for that season.  At that point, I’ll be checking the expiration dates on baking soda and baking powder (which has a relatively short shelf life), and always buying fresh flour.  A lot of these ingredients are not very expensive – when in doubt, throw it out.

butter and eggs

I have no particular preference for salted vs unsalted butter.  This recipe is not so sensitive that the salt in a stick of butter will cause it to fall apart.  What is important is that you melt the butter before creaming it with the sugars.  Some folks will tell you to avoid melting in the microwave, but I haven’t had problems.  Whether it’s melted on stovetop or in the microwave, use liquid butter in this recipe.

Eggs vs egg yolks…

What makes this recipe a little chewier and moister is

  1. There is more brown sugar than white, and
  2. We threw in an extra egg yolk.  Egg whites will add a certain stiffness.  Yolks add chewiness.

Now you know.

PICT0039

This is not a Nestle commercial!  These are just the chocolate chips I happen to have in my cupboard at the moment – they were on sale.  You can use any chocolate chips in your cookies – dark, white, M&M’s, caramel, butterscotch.  Go for it!  Use a mix of different flavors.  And use plenty of chips!  If your bag is slightly more than what you need according to the recipe – use the whole bag!

Don’t be a skimpy chipper! 

Chocolate Chip Cookie Dough (1)

Mixing the rest of the dough is fairly straightforward.  Once it’s all together, it’ll be thick and sticky.  Drop a third or a half of the dough onto a section of wax paper and shape it into a log.  Okay, I know, the picture has parchment paper!  That works, too.  I think waxed paper releases the chilled dough a little easier.  Use whichever you have on hand.  The key is to have this log of dough wrapped well and put in the fridge for 2-3 hours.  Overnight, if you want.

Chocolate Chip Cookies Apr2016 (2)

Next up you’ll cut your chilled log into sections.

Chocolate Chip Cookies Apr2016 (11)

Shape them into balls and space them out on the cookie sheet/pan.  I like to use a silicone baking sheet on my pans – makes cleanup a little easier.  Or you can use parchment paper (not wax paper!).  Or just bake on an ungreased sheet/pan.

Chocolate Chip Cookies Apr2016 (15)

Yes, my friends – these are chewy, puffy chocolate chip cookies baked at altitude, in the Mile High City!  It can be done!

“…Every time she puts another batch in the oven

There’s 15 minutes for some kissin’ and a-huggin’…”

— George Straight

Happy baking!

Mile High Chewy Chocolate Chip Cookies
Print Recipe
These cookies are so chewy and delicious - and easy to make - they will become the staple in your cookie exchange! Best yet, this recipe is already adjusted for high altitude baking. So break out the shoe box, line it with wax paper, and get ready to fill it to the brim!
Servings Prep Time
2-3 dozen 15 minutes
Cook Time Passive Time
12 minutes 3 hours
Servings Prep Time
2-3 dozen 15 minutes
Cook Time Passive Time
12 minutes 3 hours
Ingredients
Servings: dozen
Instructions
Mix the dough
  1. Cream the butter and sugars together.
  2. Sift together dry ingredients in a bowl - set to one side.
  3. Add wet ingredients to the sugar/butter.
  4. Add dry ingredients one cup at a time.
  5. Add chocolate chips.
  6. Roll in wax paper and chill in the fridge.
Bake Cookies
  1. Pre-heat oven to 375°.
  2. Roll dough into balls on an ungreased cookie sheet.
  3. Bake 10-12 minutes. Don't over bake!
Recipe Notes

Credit where credit is due:  this recipe is a variation on Alton Brown's "The Chewy".

Share this Recipe

Route 66 – Road Trip Food

(Cover photo borrowed from DrivingMamas.com)

We are getting closer and closer to my GRAND ADVENTURE driving down Route 66.  And something that every Road Trip needs is Road Trip Food!

When I was little, our family would go on road trips from Los Angeles to Nebraska or to Minnesota.  Being the youngest, I always got the middle of the back seat between my two brothers.  Mom always brought veggies and apples and oranges – but I always loved the green seedless grapes!  We only had a smallish cooler, and that was needed for the sandwich fixin’s, so our soda pop was usually warm.  But the fruit was tasty!

Fruits-and-Veggies

So the first and most important road trip food are the snack packs that God provided!  And they all seem to come in convenient serving sized packages.

Yes, I know, you may be thinking that this is the time to break out the candy and cookies!  No!  It’s not!  That sugary food will only cause you to get more tired as you drive and you’ll be less able to enjoy the wonderful world around you.  So reach for the natural energy boosters!

For me, I reached out to my blogging community and asked for more ideas of healthy snacks for the road.  Here are the suggestions – in no particular order.  The last is as tasty as the first!  Thanks to all my friends for providing these recipes!

Peanut-Butter-Puff-Granola-1.1

Peanut Butter Puff Granola from StrengthandSunshine.com

oatmealcookie

Healthy Oatmeal Cookies from Anagoesfit.com

rsz_cranberryalmondgranola3

Cranberry Almond Stovetop Granola from FoodPleasureandHealth.com

IMG_2351

Healthy Mocha Brownies from TheCleanEatingCouple.com

chocolate-cherry-larabar-bites-spilling-out-of-ball-jar

Chocolate Cherry Larabar Bites from HungryByNature.com

HealthyChocolatePeanutButterEnergyBalls2-1024x769

Healthy Chocolate Peanut Butter Energy Balls from AFitPhilosophy.com

6ingredient energy balls

6 Ingredient No Bake Energy Balls from PumpkinandPeanutButter.com

strawberry protein bars

Chocolate Covered Strawberry Protein Bars from HealthyHelperBlog.com

Salted-Caramel-Cashew-Bars4-copy

Salted Caramel Cashew Bars from 24CarrotLife.com

Cocnut homemade granola

Coconut Homemade Granola from BerriesandBasil.com.

cranberry walnut energy bites

Cranberry Walnut Energy Bites from EmmasLittleKitchen.com

choc trail mix power balls

Chocolate Trail Mix Power Bars from YoungandRungry.com

coconut-tahini-granola5

Coconut Maple Tahini Granola from ExSloth.com

Chocolate_Covered_Chickpea_Protein_Balls_4_edit

Chocolate Covered Chickpea Protein Balls from EmilieEats.com

banana-oat-bars-with-peanut-butter-and-chocolate

Banana Oat Bars from FoodParsed.com

grant ranch trail mix

Grant Trail Mix from VermilionRoots.com.

kettle corn

Skinny Stove Top Kettle Corn from EnticingHealthyEating.com

Happy Snacking!

Big Bold BBQ

Jar of BBQ

Ah, yes – your jar of BBQ sauce is only half full and it’s time to make some more.  Summer’s comin’ and you can’t let yourself run out of BBQ sauce!

I love a good bar-be-que with a bold sauce slathered all over chicken or ribs and cooked just right! And you know what “just right” is – it’s bubbly and slightly blackened on the outside with the meat cooked to the perfect doneness…  It brings to mind summer days with backyard grill sessions – the men standing around the fire, making their manly grunts while the ladies chatter around the kitchen counter making all the fixin’s and listening to the kids squealing as they play and run through the lawn sprinkler.  Ah, good times!

I recently bought some BBQ sauce at the grocery store and decided I like my own better, so here’s my go-to recipe.  I’ll mix it up, throw the pot on the stove and just walk away for a few hours.

And since I’ve made this myself, I know just what’s in it.  Okay, the ketchup is store bought, but I have my favorite brand I use that I trust.  If you make your own ketchup, awesome!

Talk about great “gifts from the kitchen”!  I filled pint jars for Christmas gifts one year.  I didn’t “can” them, just filled the jars and told my friends to keep it refrigerated.  My creative wrapping was simply colored cellophane tied with some jute twine.

So here are a few suggestions to make this BBQ sauce your own:

BBQ Blog (4)

Vinegar

Who says you have to use cider vinegar?  I once made a bbq sauce that was bold enough to call the cattle home from Texas!  I used balsamic vinegar, of all things, and adjusted a few of the other ingredients to match the bold flavor.  Bold doesn’t necessarily mean “hot”.  Go – experiment!

BBQ Blog (9)

Add a little heat…

Just because it isn’t listed in the ingredients doesn’t mean you can’t add it.  To make your BBQ hotter, increase the Tabasco.  Or use “hot” chili powder.  Or add some cayenne pepper or cumin.  You can make a BBQ sauce that’ll singe the hair off your toes, if you want.

Or make it milder…

Maybe your friends and family like to keep their toe hair.  Maybe they prefer to savor the flavor… use a lighter vinegar (white wine vinegar or rice vinegar), eliminate the Tabasco entirely, use a mild chili powder.  Or any combination thereof.  It’s YOUR sauce.

Sweetners

Every marinade contains four components: Sweet, Salt, Seasoning and Vinegar.  BBQ Sauce is a specific type of marinade, but a marinade nonetheless.  We’ve already talked about vinegar, and touched on seasonings, salt is in the garlic salt and worcestershire… now for the sweet!  The sweet component balances out the rest for a fully rounded flavor profile.

BBQ Blog (6)

I call for brown sugar because it dissolves well and has a particular flavor.  But I recognize that many of you are limiting your processed sugar.  So use your favorite go-to sugar alternative.  Honey is fabulous in BBQ sauce!!  I have not experimented with other sweetners, but keep in mind that you are going to simmer this thing for several hours.  Be careful that the sweetner you choose can take the heat.

Go Forth and BBQ

I hope you see what I’m trying to do here.  I attended culinary school and the entire time our chef instructors were telling us to put away our books and recipes and just GO MAKE IT!  I love this sauce because it doesn’t need tending.  You can mix it up and let it simmer all day, if you want.  And after you’ve made it a few times, and tweaked it to your own personal satisfaction, then it becomes YOUR sauce, YOUR flavor, YOUR signature!  No one else will have a BBQ sauce quite like yours.

Big Bold BBQ
Print Recipe
You can make this BBQ sauce as bold and spicy or as mild as you want - just make it all yours!
Servings Prep Time
2 quarts 10 minutes
Cook Time
3-4 hours
Servings Prep Time
2 quarts 10 minutes
Cook Time
3-4 hours
Big Bold BBQ
Print Recipe
You can make this BBQ sauce as bold and spicy or as mild as you want - just make it all yours!
Servings Prep Time
2 quarts 10 minutes
Cook Time
3-4 hours
Servings Prep Time
2 quarts 10 minutes
Cook Time
3-4 hours
Ingredients
Servings: quarts
Instructions
  1. Mix all ingredients in a large pot and simmer on low for 3-4 hours, until the sauce reaches your desired consistency. (I happen to like a very thick bbq sauce.) Stir occasionally.
Recipe Notes

I use mustard so rarely that I will "make my own" for this recipe.  1 cup of yellow mustard can be made by mixing 3 Tbsp of powdered mustard with 1 cup of cider vinegar.

Share this Recipe